
Using ActiveXperts Serial Port Component with ASP .NET (C#)
ActiveXperts Serial Port Component is a software development kit (SDK) that enables the user to communicate to a device over a serial interface.
Such a device can be: a weight indicator, a modem, a scanner, or any other device that is equiped with a serial port. It can even be another PC, connected via a NULL modem cable.
ActiveXperts Serial Port Component features the following:
- Direct COM port support (like 'COM1')
- TAPI (Windows Telephony Device) support (like 'Standard 56000 bps Modem');
- Support for RS-232/RS422/RS485, up to 256 simultaneous ports;
- Support for all types of Hayes compatible modems;
- Support for serial cable as well as USB cable or Bluetooth connections;
- Support for Virtual COM ports (i.e. COM ports redirected through the network);
- Hardware flow control (RTS/CTS, DTR/DSR) and software flowcontrol (XON/XOFF) support;
- Configurable baudrate/parity/stopbits, full buffered data transfer, text/binary data transfer.
Prerequisites
You must install and configure Internet Information Services (IIS) before using the ActiveXperts Serial Port Component with ASP .NET If you don't have IIS installed, use the following steps:
- From the Control Panel, click 'Add/Remove Programs'.
- Select the 'Add/Remove Windows Components' icon from the left pane.
- Select 'Application Server' and click on 'Details'.
- From the Control Panel, click 'Add/Remove Programs'.
- Select both 'ASP .NET' and 'Internet Information Services (IIS)'.
- Click 'OK' to finish the installation'.
Step 1: Download and install Serial Port Component
Download the ActiveXperts Serial Port Component from the ActiveXperts Download Site and start the installation. The installation guides you through the installation process.
Step 2: Create a new ASP .NET C# Project
Launch Microsoft Visual Studio from the Start menu. Choose 'New' from the 'File' menu and click on 'Web Site'. In the 'Web Site' dialog, select ASP .NET Web Site. Select a name for the application, we used: 'DemoApp', and a name for the solution, we used: 'DemoSolution'. Finally, select the directory where you want to store the project, for example: 'C:\MyProjects':
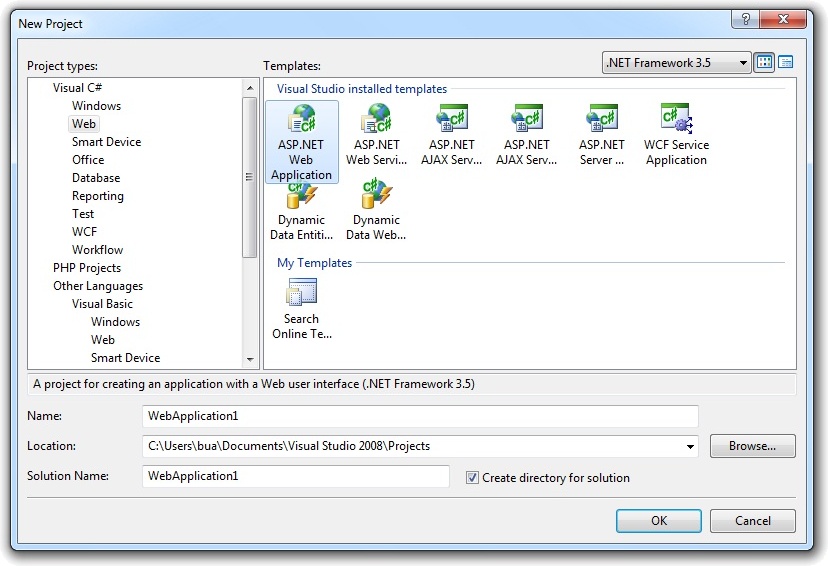
(Click on the picture to enlarge)
Step 3: Refer to the ActiveXperts Serial Port Component Library and create the objects
Now that a new project has been created, you must add a reference to the ActiveXperts Serial Port Component in the project to be able to use the ActiveXperts Serial Port Component object. To do so, choose 'Add Reference...' from the 'Project' menu. In the 'Add Reference' dialog that pops up, select the 'COM' tab and select the 'Serial Port Component Type Library' as shown in the following picture:
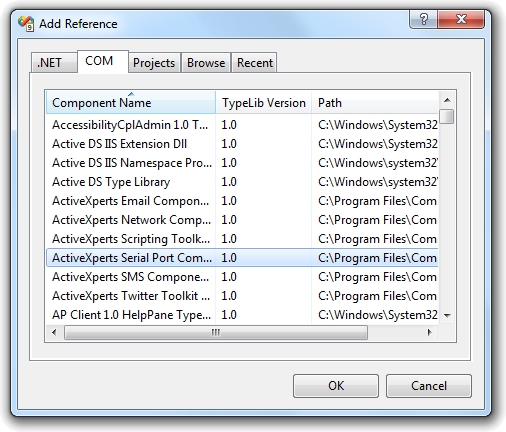
(Click on the picture to enlarge)
Click 'OK' to close the 'Add Reference' dialog.
On top of your code, type the following line to use the ActiveXperts Serial Port Component namespace:
using AxSerial;
In your Main function, declare and create the following object:
public ComPort m_objComport;

m_objComport = new ComPort();
Step 4: Send an AT command to a Hayes compatible modem
You can now send and/or receive to/from a serial interface.
The following code shows how to query a modem:
using System;
using System.Collections;
using System.ComponentModel;
using System.Data;
using System.Drawing;
using System.Web;
using System.Web.SessionState;
using System.Web.UI;
using System.Web.UI.WebControls;
using System.Web.UI.HtmlControls;
using AxSerial;

namespace WebApplication
{
  /// <summary>
  /// Summary description for WebForm1.
  /// </summary>
  public class WebForm1 : System.Web.UI.Page
  {
    public ComPort m_objComport;
    protected System.Web.UI.HtmlControls.HtmlInputText textCommand;
    protected System.Web.UI.HtmlControls.HtmlTextArea textResponse;
    protected System.Web.UI.HtmlControls.HtmlTextArea textResult;
    protected System.Web.UI.HtmlControls.HtmlSelect comboDevice;
    protected System.Web.UI.HtmlControls.HtmlForm Form1;
    protected System.Web.UI.WebControls.Button Button1;

    private void Page_Load(object sender, System.EventArgs e)
    {
      int i;

      m_objComport = new ComPort();

      comboDevice.Items.Clear ();

      for( i = 0; i < m_objComport.GetDeviceCount (); i++ )
      {
        comboDevice.Items.Add( m_objComport.GetDevice ( i ) );
      }

      for( i = 1; i < 9; i++ )
      {
        comboDevice.Items.Add( "COM" + i.ToString () );
      }
    }

    #region Web Form Designer generated code
    override protected void OnInit(EventArgs e)
    {
      //
      // CODEGEN: This call is required by the ASP.NET Web Form Designer.
      //
      InitializeComponent();
      base.OnInit(e);
    }

    /// <summary>
    /// Required method for Designer support - do not modify
    /// the contents of this method with the code editor.
    /// </summary>
    private void InitializeComponent()
    {
      this.Button1.Click += new System.EventHandler(this.Button1_Click);
      this.Load += new System.EventHandler(this.Page_Load);

    }
    #endregion

    private void Button1_Click(object sender, System.EventArgs e)
    {
      m_objComport.Device = comboDevice.Value.ToString ();
      m_objComport.BaudRate = 9600;
      m_objComport.ComTimeout = 500;

      m_objComport.LogFile = "C:\\ComLog.txt";

      m_objComport.Open ();
       m_objComport.HardwareFlowControl = -1;

      textResult.Value = "ERROR " + m_objComport.LastError + " : " +
        m_objComport.GetErrorDescription ( m_objComport.LastError );

      if  ( m_objComport.IsOpened == -1 )
      {
        m_objComport.WriteString ( textCommand.Value );

        textResponse.Value = "";

        while ( m_objComport.LastError == 0 )
        {
          textResponse.Value += m_objComport.ReadString () + "\n";
        }

        m_objComport.Close ();
      }
    }
  }
}
There are many working samples included with the product. You can also find them on the ActiveXperts FTP site: ftp.activexperts-lab.com/samples/serial-port-component.
NOTE: Demo Projects are created with Microsoft Visual Studio 2005
The project ships with a set of Microsoft Visual Studio .NET samples, including samples for Microsoft ASP .NET C#. The projects are created with Microsoft Visual Studio 2005.
Users with a later version of Microsoft Visual Studio can open such a project. The Visual Studio Conversion Wizard will guide you through the process of converting the project to the version used.